WooCommerce Vendor Marketplace Pro is the most powerful multi-store / multi-vendor solution available.
Vendor MarketPlace Pro the defacto standard for building multivendor marketplace with WooCommerce. The software makes it easy for you create an online marketplace for people to sign up, create their own store, and sell their products. And you control who can become a vendor, and how much (if any) of the product sales you keep for yourself.
It’s professionally designed, professionally supported, and gives you the power to build your multi-vendor store site beautifully.
Total Frontend Management for Your Vendors’ Stores
Vendor Marketplace Pro has a complete frontend management system for your vendors that lets them manage all aspects of their store and their sales, including products, orders, shipping, tax tables, coupons, sales reports, and their ratings and reviews from customers.
It is unquestionably the most powerful and most advanced frontend management system available. And we think you’ll agree that it’s built beautifully.
Have a look below, read about the features your vendors enjoy with Vendor Marketplace Pro.
Products
The product editor in Vendor Marketplace Pro is the most feature rich and powerful available, and it’s very flexible. It allows your vendors to have total control over all aspects of their product’s data. You, as site administrator, have control over the most of the available product editor settings. You can allow your vendors to post simple products, variable products, grouped products, downloadable products, auction products (using our WooCommerce Auctions Pro add-on), and more.
Your vendors can easily add new products, including adding images, selecting categories for their products, and tagging their products with whatever keywords they want to use. When new products are posted by vendors you can optionally screen those products before they go live on your site.
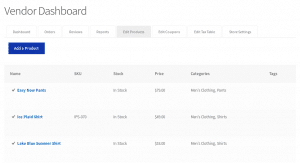
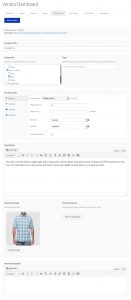
You can see a sample of the overall product list, and the product editor, in the screenshots below. Note that with the product editor, you as the site administrator can rearrange the sections in any order you prefer via a simple drag and drop interface. So for example, maybe you want the categories and tags section to be moved below the product data and description – no problem, you can do that.
Orders
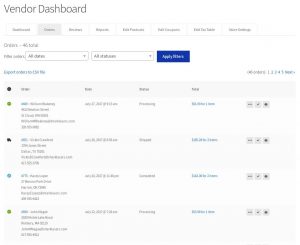
The first screenshot below shows a vendor’s list of orders, for each order there is the order number, status, total, and quick action buttons to quickly view the order, or mark the order processing or completed.
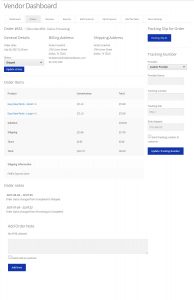
This next screenshot shows the order details. The details show the billing and shipping address information, the items in the order along with the costs and commissions earned by the vendor. On the right is button to get a packing slip for the order, and a form to enter shipment tracking information that can be sent to the customer. Near the end of the order are any order notes and a form to add notes to the order.
Taxes
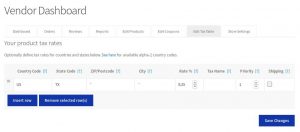
You can optionally allow your vendors to manage their own tax tables with an easy to use interface as seen below. Any tax rates defined by the vendor only apply to their products.
Coupons
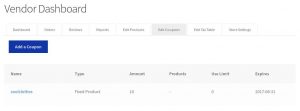
Optionally allow your vendors to create coupons for their products. Any coupons created by vendors only apply to their own products.
Reports
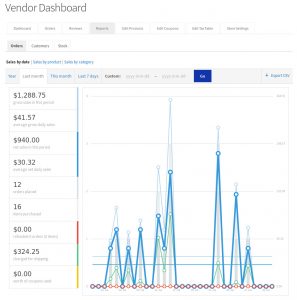
The report sections gives vendors a good view of their sales over time. There are reports for orders, customers, and stock. The order reports can narrow by time ranges, products, or categories of products. An example of a report for the past month is shown in the screenshot below.
Shipping
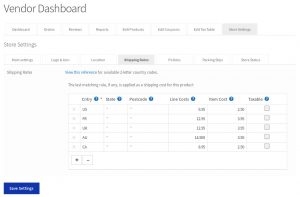
You can optionally allow your vendors to define their flat rates for shipping. Rates can be defined global for the vendor’s entire store, and in individual products if a products needs to have different rates.
The screenshot below shows the global rates for a vendor’s entire store.
Vendor Marketplace Pro also has direct support for Ignitewoo’s UPS Drop Shipping, Fedex Drop Shipping, and USPS Drop Shipping, which helps your vendors and shoppers get the most accurate rates possible, and ensures vendors receive the shipping costs for their items when purchased by shoppers (similar to eBay, Amazon, Etsy, etc).
Reviews and Ratings
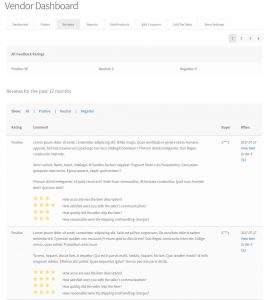
You can optionally enable reviews and star ratings, which when enabled allow shoppers to leave a review for the product after the purchase an item.
Reviews include text, and optionally up to four levels of star ratings (similar to eBay), and you as site administrator control the text description associated with each star rating level. In the screenshot you can see the defaults, for example “How accurate was the description?” … etc. You can change the associated text to anything you prefer. You may also choose to make all reviews public, or only available to administrators and the vendors. And, as an administrator you can edit or delete reviews in the WP admin area of your site.
Inquiry Forms
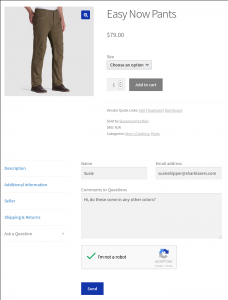
You can optionally enable an inquiry form that appears on single product pages, so if shoppers have a question about the product they can send a message to the vendor. The form can include an optional Google reCaptcha anti-spam check too. You can see an example of the inquiry form, with captcha, below.
Payment Gateways and Revenue Splitting
Vendor Marketplace Pro also comes with PayPal’s latest and greatest split payment system, PayPal Payouts, it’s built-in, and it lets you split the money from the sale of items between you and your vendors automatically. With Payouts you can use any payment method on your site to receive payments for orders from your shoppers, and then you can split the money with your vendors using Payouts automatically.
Vendor Marketplace Pro also comes with PayPal Adaptive Payments built-in, which lets you split the money from the sale of items between you and your vendors at the time of checkout. Note that PayPal is retiring Adaptive Payments. But no problem, Payouts is their new and improved replacement and as we mentioned it’s built into Vendor Marketplace Pro already!
PayPal Mass Pay is also built-in, so if you want pay your vendors periodically you can do that too, either automatically at your preferred interval (for example, every 30 days), or manually when you’re ready with a ready-to-use CSV file.
You can also use our Stripe Payments gateway.
If you decide to configure your site to split payments with vendors you define the percentage of the sale you want to keep. You can set the percentage globally for all vendors, or differently for different vendors. Your choice.
Store Listings
The plugin includes a shortcode that you can use to publish a list of all vendor stores on your site. And you can customize the related template file. See the screenshot below for an example listing.

Fully customizable templates
All the templates of the vendor’s dashboard are highly customizable, and you won’t lose your customizations when you update the Vendor Marketplace Pro software.
Customizable vendor registration form
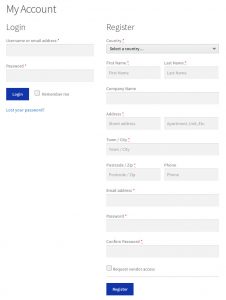
Vendor Marketplace Pro includes a drag and drop vendor registration form builder that appears on your site’s My Account page. Use whichever fields you want, and you can screen all requests for vendor access or grant all requests automatically, or totally disable vendor registration.
In the screenshot below you can see the registration form on the My Account page with all the default registration fields. At the bottom of the form is a checkbox to request vendor access, which when checked sends you an email letting you knowing that someone registered.
Store Settings
Each store has a full range of settings that allows your vendors to brand their store elegantly. Settings include:
- Store name
- Description
- Logo & Icon
- Address location
- Shipping policies
- Return policies
- Store status
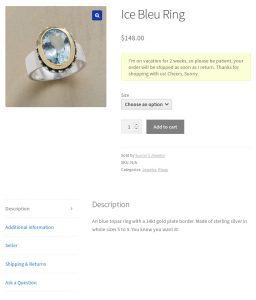
The store status setting lets your vendors temporarily close their store (for example, if they’re out on holiday), temporarily disable all purchases, and/or add an informational message to their store pages and product pages. For example, maybe a major storm struck their area and they know that shipping will be slower than usual, they can add a notice alerting shoppers. See the screenshot below for an example, you’ll see the store notice in the yellow box on a product page.
Payments and Commissions
PayPal Payouts, PayPal Adaptive Payments and PayPal Mass Pay are built into the software, so your shoppers can pay via PayPal and you as the site operator can take a percentage of the sale.
An obvious question is “How do I pay my product vendors when their items sell and how do I collect a percentage of the sale for myself?” We’ve given you a ton of flexibility so you have numerous choices.
First lets review how vendor commission are recorded. Any time a sale takes place on your site the entire order is checked to determine if any items in the order are being sold by a vendor on your site. Then, when shopper actually makes payment the payment gateway checks all items in the order to determine if each one is sold by vendor. If an item is sold by a vendor then the gateway calculates how much money the vendor should receive for that item ( based on your configured commission settings ), and also checks to see if the vendor has their related payment gateway account connected to their account on your site. If they do then the gateway can pay them instantly if you’ve enabled that option, and the gateway notes that the amount due is being paid instantly. The gateway also calculates how much of the item sale price is due to your site and adds that amount to the total amount due to your store. And if they don’t have the related payment gateway account connected to their account on your site,, or you’ve disabled the instant payments options, then the vendor cannot be paid instantly and the gateway notes that the amount due is unpaid. If an item isn’t sold by a vendor then the gateway adds the entire item amount to the amount due to your site itself. After the order payment process completes, all commissions for vendors are recorded in the database as either paid or unpaid.
So that’s the basic flow of the payment process and payment record keeping. With that in mind you have options as how you want to pay your vendors.
Option 1: Instantly and automatically pay vendors using one of the following payment gateway plugins available from IgniteWoo: PayPal Adaptive Payments, PayPal Payouts (both built into WooCommerce Vendor Marketplace Pro), or Stripe Payments (sold separately). When vendors connect their respective user account on your site to one of the above gateways your site can send them payment instantly every time they sell an item. If vendors opt not to connect their payment account then their commissions are recorded as “unpaid” and you can process those payments whenever you prefer.
Option 2: Disable instant payments, use any payment gateways you prefer to collect payments from shoppers, and pay vendors automatically at whatever interval you prefer using PayPal Payouts (built into WooCommerce Vendor Marketplace Pro). This option requires that vendors have a PayPal account and configure their PayPal account email address into their store settings. You can enable an option in plugin that requires vendors to enter their PayPal email address, and they are not allowed to post products for sale unless that address is provided. Mass Pay requires that you have a PayPal Business or PayPal Premier account.
Option 3: Disable instant payments, use any payment gateways you prefer to collect payments from shoppers, and pay vendors manually using PayPal Payouts (built into WooCommerce Vendor Marketplace Pro). You schedule a payment to a vendor manually any time you need to and payments go directly to the vendor’s PayPal account. This option requires that vendors have a PayPal account and configure their PayPal account email address into their store settings. You can enable an option in plugin that requires vendors to enter their PayPal email address, and they are not allowed to post products for sale unless that address is provided. PayPal Payoutrs requires that you have a PayPal Business or PayPal Premier account.
Option 4: Disable instant payments, use any payment gateways you prefer to collect payments from shoppers, and pay vendors manually using PayPal Mass Pay, which is built into WooCommerce Vendor Marketplace Pro. With MassPay you can view all vendor commissions using the plugin’s Commissions admin page and export a CSV file of all unpaid commissions, then import that into the Mass Pay interface within your PayPal account to deliver all due commissions. This option requires that vendors have a PayPal account and configure their PayPal account email address into their store settings. You can enable an option in plugin that requires vendors to enter their PayPal email address, and they are not allowed to post products for sale unless that address is provided. Mass Pay requires that you have a PayPal Business or PayPal Premier account.
Option 5: Disable instant payments, use any payment gateways you prefer to collect payments from shoppers, and pay vendors manually using any method of delivering payment that you prefer. Again, you can view all vendor commissions using the plugin’s Commissions admin page and export a CSV file of all unpaid commissions. You can use that CSV to handle your manual payment processing and then mark those commissions as paid. So for example, maybe you want to mail vendors a check each month, or pay them with your bank card somehow, etc.
Pay to Post Products / Pay to Feature Products – The Token System
If you want to charge your vendors to pay to post products or pay to have products featured on your site, you can do that! We have an Vendor Marketplace Pay to Post add-on available that works based on a token system. Vendors purchase tokens and are charged a configurable number of tokens each time they post a product on your site. Likewise if they choose to feature a product on your site they are charged the number of tokens you define. (The pay to feature aspect requires that your site’s theme has a way to display featured products).
Great Support
All of our software comes with great support via email and toll free phone!
Questions? Need help? Call us any time between 10am and 6pm Central Time. See the Contact Us page for the phone number and contact form.
Frequently Asked Questions
- Do you have a demo? Yes, scroll down this page for a link!
- Do you recommend any specific theme for my site? Any theme that works with WooCommerce 3.0 and newer should be fine. If you’re starting with a new site consider using the official theme for WooCommerce, Storefront along with the Storefront Customizer add-on
* REQUIREMENTS!
You must be using WooCommerce 3.0 or newer to use Vendor Marketplace Pro.

